
Tuesday 5 March 2013
Evaluation
Evaluation – Photo Skills B
Laura Parkinson
Photo Skills B proved
to be a very challenging unit for me; I had never edited a photograph in depth
before, only dabbling with the brightness and contrast, curves, saturation and
cropping before. Using masks, lassos and clear brush tools was something I could
not grasp. However, the workshops I attended brought me some knowledge, and
self study and editing time brought me up to speed with most people in my
class. Using masks is still something of a problem for me, I could not grasp
how to use them effectively in my final edited photograph, and so I left them
out. I couldn’t understand why they would benefit me, or help in any such way.
I am impressed and
surprised with how my final image turned out. It took me four photo-shoots and
about 7 hours of staggered editing, but the end result represents how I pictured
a cyborg well. I originally was going to make the background darker after
taking the photograph of the arm on a cream/white background, however, I
decided to take a photograph in a graveyard and edit it onto the back of the
cyborgs arm. This worked exceptionally well, and gave the image a
professionally edited look.
If I was to take this
unit again, I would think more about where I was taking my photographs. Not
using a studio location and taking the shot within my house made the editing
task a lot harder. I had to use the clear paintbrush to clear away the white
background to reveal the gravestone, whereas if I had used a studio I would
have used the magnetic lasso tool. This was made near impossible in places that
I had to edit, as the shadows were too strong and blended too closely with the
arm. I would also stick to my proposal from the beginning, as I have a habit of
steering away from my original idea and beginning a new one. This idea that I
submitted as a final was based on my proposal, but far from the image I had in
my head from the beginning.
Editing #6
My image still looked flat, so I decided to add a faint shadows following the direction of the lighting I edited on (using shadows and the burn tool).

I duplicated the layer for two reasons; I didn't want to lose all my work if I was to do something wrong and also because then I could get an exact shape the same as the original hand, which would look authentic.

I then changed the Levels to make the hand completely black. I chose to do this rather than painting over the surface using a black paint brush, as it gives it a more even and covered surface, rather than realised I hadn't painted over a small section, after I edited the entire image and sent it off for printing.

I then placed the image behind the hand, by dragging the layer underneath the hand image. The layers I have are in order of what is in front, and seen first. Therefore, all my wires are at the top of the list, then my 'bone', followed by the arm, shadow and then graveyard background.
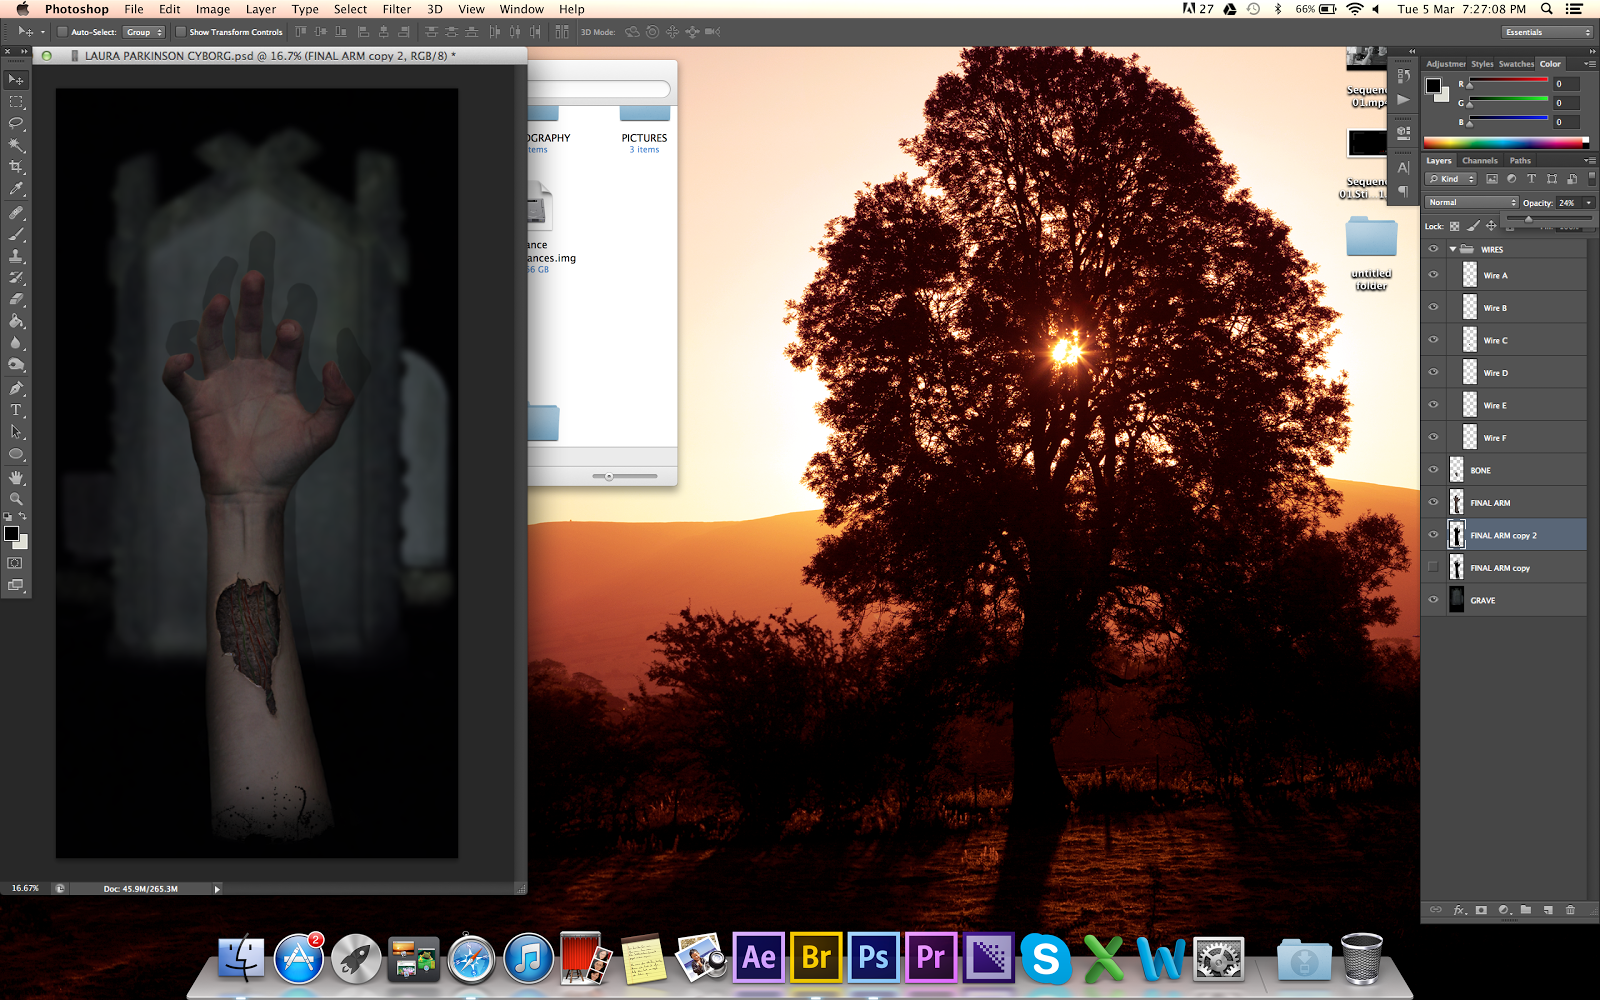
I then lowered the opacity to 24%, to make the shadow look like an authentic shadow.

Finally, I used the gaussian blur tool to blend the shadow into the gravestone in the background. The gravestone had been blurred using gaussian blur, so it felt right that it was used for the shadow too!
Printing

I used Adobe Illustrator for printing my final image, with dimensions of 390mm x 276mm, and a bleed area of 2mm. My final image was taller than average photographs, so I had no choice but to have a border around my photography, which I like anyway. I used a flattened TIF file, rather than a JPG file, and placed it in a file with the correct dimensions. Illustrator is good for creating "art boards", and you can experiment with bleed, borders and titles in your work.
Editing #5

I asked some fellow photographers and editors what they thought needed improving on my final image. They said that my arm looked flat, so I used the burn tool to burn around the edges of the photograph, to cast a shadow as if the light source was coming from the front of the arm. This worked amazingly, and looks as if I used a studio location, when in fact I used a wall at my house!

Editing #4
After discussing how I was going to compose my background, I decided upon the idea of using a graveyard! I placed the background in Photoshop, and applied a gaussian blue at 23.1 pixels. This made the gravestone look like it was taken at the scene, with the hand penetrating the ground, and not an edited version.

I then cleared the arm layer image from the background, meaning that they gravestone came through the image, looking like the hand was taken in front of the gravestone. To achieve this, I used the magnetic lasso tool to draw around the fingers, inverse the selection and then erased from there. This meant that the fingers weren't painted out, and it looked clean and crisp.
I then used the blur tool on 100% tolerance to blur the edges of the fingers, to make them look less fake. I then decided to move the arm upwards in the image to achieve a tighter crop.

I then realised that the arm looked odd, as the original color of the arm looked warm and bright, not dull and dead like I wanted it to look like. I used the desaturation tool in hue and saturation and took it to -60%. This suited my intentions better than having a bright and warm arm. I then used the colour balance tool, turned the brightness down and levels to make it look more believable.

I used the Levels to make the shadows darker in some places, which worked really well. I then took on the challenge of making the hand look like it had come out of the ground, by applying mud and dirt to the base of the arm. I used a brush copyright free for personal use from a website, (http://myphotoshopbrushes.com/brushes/id/218) called Spetter, Splash and Splatter, which gave me 43 brushes to use. I used 6 or 7 of these brushes to create the textured area at the bottom of my arm.
Sunday 3 March 2013
Editing #3
After discussion with classmates and my tutors, I have decided I am going to make my background a graveyard, with the arm coming through a grave underground. I have taken inspiration from seeing this on television and some front covers of television DVDs for shows such as Supernatural.
The angle I had taken my arm at meant that the arm was slightly bent and curved. Therefore, I used several techniques to correct this.

I cropped the image just above the elbow, and used the content aware filter to erase some of the remaining arm, to elongate it and make it easier when editing later on.

I then used the puppet warp tool to make the arm straighter. I kept the mesh on as it helped me concentrate, but was difficult to see if it was working underneath!

Here is the final result! On the left is the image after digital manipulation, and on the right is the image before. I am pleased with the outcome, and I am glad that I have decided to do this, as the arm looked abnormal before because of the angle is was taken at. It will also look more believable when I edit it in a graveyard coming out of the ground because it is on more of straight angle!
Wednesday 27 February 2013
Graveyard Photoshoot
After solving the problem of how I was going to present my background, I decided to use the location of a graveyard, and chose a graveyard near my house as the location. Me and my Dad went to the graveyard at night and got some great photographs!

My original idea was to use this fenced grave as a location and have the arm coming up from it, with the grave still in front. However, I couldn't get a successful low angle shot, which looked okay to use, so I quickly moved on and found an alternative location.

Here is just a quick photograph of the graveyard as a whole, I wanted to use one of the taller gravestones, but couldn't get the correct angle and fit the stone in. Therefore, I opted for a smaller, typical shaped gravestone from the yard.

A dark photograph, but here is the gravestone I used. I brightened the RAW image up, using the exposure tool.

I lightened this up, and cropped it to use as my background for my hand image. I think it works well, however, I might need to crop it some more to make it a better looking and pleasing crop.
Tuesday 26 February 2013
Editing #2
After adding the wire to the photograph I am editing, I decided to add some more wires, using the original wire image, to make it look better. I took the first wire I edited in and renamed it 'Wire A', to separate it from the other wires I would be adding in. I then duplicated the layer, calling it 'Wire B'. John showed us of an amazing tool called puppet warp, whereby you can pick point of a layer and morph it into shape.


The puppet warp was in the 'Edit' toolbar, and you picked points by clicking on the appropriate part of the layer. I chose 4 points along the wire. This allowed me to bend and morph the wire so it looked different from its original layer.
Monday 25 February 2013
Wires Photoshoot


I decided to make my bedroom into a studio and take photographs of wires I got from an ethernet cable. I thought they were small and thin enough to edit onto my final composition.
Friday 22 February 2013
Editing #1
I have been outside this morning and taken about 50 photographs of different cracked walls and peeling paint, so I could capture alternative angles. Here are some of my favourites, and ones I will be using in my final edit!


I found that photographing cracks on a singular coloured wall would be easier to blend in post production, hence the colours of paint I have chosen. I put some of these in Photoshop and documented what I learnt in a quick half an hour session!
 |
| Quick Edit |
This edit took me approximately 15 minutes, and consisted of me blending and clearing the photograph of the broken wall over the top of the arm I have shot. It was only when I flatten the layers and looked at the final image that I noticed that it looked a lot like bone and muscle underneath a human body, which was achieved by the texture of the photograph. I used photograph 2 from above, and changed the transfer mode to overlay and changed the colour balance to match the skin tone of my model. Placing it in a central composition over the arm made it look more realistic and bone like, which helped with the overall look. I would like to continue with this idea, using different wall textures to create a human like, cut open effect, and have different technology and wires sticking out of it.

When I was edited, I decided to experiment with the transfer layers, and see what effects I could achieve by using them all. I was originally using overlay, which presented me with a red, grainy texture, which looked almost like broken skin. I then decided to try the hard light layer, and it gave me this dark, cracked look on the skin! I was amazed that by changing the transfer layer, the overall image could look completely different.
Monday 18 February 2013
Practice Edit
I took a mock photograph today of my boyfriends arm, and decided to use a ripped wallpaper image off Google to blend over the top, to achieve the effect I was looking at. This was the second time I had used the Wacom Bamboo tablet, so I am pretty impressed with the result!

I used the Wacom Bamboo tablet and its stylus to achieve a drawing effect, which meant I could control what I was blending and clearing more effectively. I took an image of a ripped wall off Google Images (for my final image, I want to take my own images), and placed it over the top of the arm. I then changed the colour balance to make the wallpaper blend more easily, turning it from pure white to a skin colour matching my model. I then took the paint brush tool, and selected the "clear" option, and then started to erase the layer to blend it in more effectively. I learnt from this exercise that turning the flow right down to 20% or less meant that the layer blended better.
For my final image, I plan to take a ripped wallpaper photograph, that I sourced and taken myself, and blend it over a picture of machinery or another modern technology, to create a effect that looks like the technology is breaking through the skin.
For my final image, I plan to take a ripped wallpaper photograph, that I sourced and taken myself, and blend it over a picture of machinery or another modern technology, to create a effect that looks like the technology is breaking through the skin.
Saturday 16 February 2013
Inspiration for Editing

Here is the type of effect I want to achieve in this project, the skin ripping away to reveal technology underneath... I have been inspired by the concept of this tattoo, the skin being ripped apart to reveal another personality underneath, and have taken this and applied it to this project. The concept of people choosing to become cyborgs made me think, and I chose the demonstrate this using this technic. Let's hope it works!!
Friday 8 February 2013
Human Cyborgs
I have been conducting research into real life, human cyborgs, and read an article on Wired which researches into them. Some people are classed as part-cyborg, part-organic through having complex medical procedures and operations, whereas some people choose to become a cyborg through scientific advancement and research.
Firstly, Jesse Sullivan was hailed as the worlds first 'bionic man' when he replaced his lost arms with robotic prosthetics. He took the nerves which originally ran through his arm and used them to control the arms that replaced his damaged ones.

Kevin Warwick is another person who can be classed as a cyborg, but decided to become a cyborg out of choice rather than necessity. He experimented on himself, and firstly implanted a RFID chip under the skin of his forearm, allowing him to control lights, heaters and computer equipment without having to touch them. The room detected his was inside, and responded accordingly. Kevin Warwick was the first person I had heard of who chose the become a cyborg.
The second experiment he conducted saw him connect the nerve fibres under his wrist to an array of electrodes, where he then connected them to a number of computer devices. This lead to the finding that humans could connect their nervous system to the internet for all to see, a dramatic finding that could change the way humans work in the next couple of hundred years.

Rob Spence replaced his eye with a video camera after losing it during a gun accident when he was 13, which sent real time colour video to a remote display that he personally owned. I have heard of a number of people who wear eyeborgs, as a means of capturing still images during the day, or video like Spence himself has done.
Jerry Jalava replaced his finger with a USB stick, the strangest cyborg transformation I have heard of to date! His transformation has been compared to that of Black Sabbath's Tony Iommi, who placed thimbles on the end of the fingers he has lost when he was 17, in order for him to play guitar better. Jalava replaced his with a USB stick as it was useful for his career as a computer programmer.

Thursday 7 February 2013
How To Build A Bionic Man: Channel 4 07/02/13
Watching this television programme was a fascinating insight into how technology is used to help people with disabilities in so many different ways, from the use of bionic arms and legs, to the more extreme of powered hearts and the choices people make to whether they want to get their fully working legs removed to make way for bionic legs, or not.
In regard to my proposal, this television programme helped me see the views of people with disabilities on the subject of people choosing to become cyborgs. The show concentrated on the technology behind the aids, but peoples views on certain subjects were foretold through one on one interviews with people effected by bionic technology.

After reading an article on Digital Spy, I learnt more about why the programme was made. The robot they made using the technology spoken about in the programme was used to construct a real-life version of the One Million Dollar Man, and is an example of an exoskeleton. The robot was made by scientists Richard Walker and Matthew Godden and cost over $1 million to make, using cutting edge limbs and organs. Taken from the article, "Dr Meyer's £30,000 bionic hand is known as the most advanced in the world. He revealed that he had a 'personal interest' in the 'explosion of innovation' over the past six years.'

Watching this has definitely given me the boost I need to start editing and planning how I am going to construct my cyborg like images, I am going to continue forth with both ideas of using a full body image and creating artificial limbs, as well as the idea of using a image of a forearm and have the technology breaking through the skin.
http://www.digitalspy.co.uk/odd/news/a456400/real-life-bionic-man-unveiled-by-scientists-photos.html
http://www.digitalspy.co.uk/odd/news/a456400/real-life-bionic-man-unveiled-by-scientists-photos.html
Wednesday 6 February 2013
Initial Research
After receiving my brief I conducted some initial research into the subject of cyborgs.

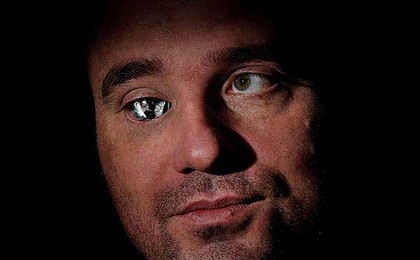
I think the photograph above is the perfect visual embodiment of the typical cyborg. The doll-like complexion and cut-out features upon the 'skin' allow for this to be recognisable as a humanoid, but the airbrushed features give the figure an almost perfect, non-human, appearance, which to me, describes exactly what a cyborg is.


This image is from an Advanced Photoshop tutorial website, and I love the composition of the shot, and love the nude tones that have been used to make the cyborg part of the human the main part of the photograph. I would like to achieve the same concept that this photograph has achieved, of showing the skin translucent with the mechanics underneath. However, I would prefer to show the skin peeling, rather than a fake cut out.

This artist has painted their cyborg mechanism onto their model, using black, white and grey paint to create the cogs and mechanics, and red to make the skin look like it is bleeding. I love this concept, and would like to experiment slightly with the idea of drawing my mechanics rather than photographing them. However, I am not a very good artist; my photography is stronger than my drawing, so I think I will still overlay my photography, rather than my drawings. However, it would be good to experiment and have some fun!

This photograph has been taken from a magazine, and edited by a photographer. I love the composition of this image, but I don't know who took it. The editor has taken the middle section of the model and replaced it with mechanics that make it look like the spinal cord of a robot.
Tuesday 5 February 2013
Proposal
After researching into the idea of a cyborg, I have decided to focus on how people with disabilities use technology to help their lives, and place them in contrast with people who chose to replace limbs with technology. I have read many articles where people who have lost their sight, or hearing have had them reversed by using 'cyborg' type technology. Jens Naumann was given artificial vision as he was born blind, it is extraordinary how technology can change peoples lives.
My initial plan, after discussing it in more detail today at the group crit, would be to take a full length photograph of a person, and Photoshop a artificial limb onto the body, which I could make out of mechanics and cogs that I can find and photograph myself. However, if this is not possible, I will use a stock image and Photoshop this instead. My Photoshop skills are not brilliant, so I want to take this opportunity to make them better! This project is not about taking the most amazing photographs and making them look super real. I want to develop a skill, and using this project to develop them, whilst receiving help off tutors and fellow classmates is a fantastic opportunity to do so!
I also had an alternative idea, whereby I take a photograph of a person's forearm, and Photoshop the technology almost breaking free of the person through the skin. I have seen this be done on posters and advertisements for films such as Spiderman and The Hulk, where the internal hero is breaking through the skin of the normal character. I think that this will be a difficult task to achieve, but if I try hard to develop my Photoshop skills over this short period of time, I think I will be able to produce an image of a high standard. This is looking like a more likely idea, as the first idea sounds boring and wouldn't challenge me, as I can already do this in Photoshop!
Museum of Science and Industry
Today, I visited the Museum of Science and Industry, or MOSI as I will refer to it, to see some of the old machinery that was present in the 1800's. We thought that this would be a good starting point in order to see what time of technology we would want to use for our cyborg. After the journey today, I decided for definite that I wanted to use modern technology rather than dated technology. Although the idea of using cogs and mechanism is very interesting, using modern technology in my images will give them more of an edge, and make them stand out more!
Monday 28 January 2013
Cyborg
We received our new project; create a cyborg using Photoshop techniques. I am so looking forward to this project, as a way to develop my lack of Photoshop skills and help me out a little!
Cyborg; noun
A fictional or hypothetical person whose physical abilities become superhuman by mechanical elements, built into the body.
When I first thought of a cyborg, I was instantly drawn to the image of the cybermen in the well known series, Doctor Who! The idea of merging people together to create a half human, half technological figure is something that seems to be decades away from being practiced. I am really excited about this project, because I am looking forward to developing my PhotoShop skills, as well as seeing what I can produce!
Subscribe to:
Posts (Atom)